Towing isn’t about romance. It’s logistics. You have a payload. You have a destination. You want both to arrive without the trailer dancing on its axles or grinding your tires into dust. To make that happen, you need to respect the invisible hero inside your wheel hub: the trailer bearing.
You won’t see them unless you tear the assembly apart. That’s the point. These components are buried deep, doing the heavy lifting so you don’t have to. They eliminate friction. Without them, a heavy load would seize up your wheel movement instantly. But bearings are delicate beasts. They demand grease. They demand respect. If you ignore them, they wear out. And when they fail, your trailer becomes a very expensive paperweight.
Understanding what’s inside that hub isn’t just for mechanics. If you own a trailer, or plan to tow one, knowing how to keep these parts alive saves you from roadside disasters. Let’s look at the mechanics.
The Friction Problem
Let’s start with the basics. Dragging a box across the pavement works in theory. It fails in practice. Friction destroys goods. It slows progress. It destroys energy. Wheels solve this by turning rolling resistance into manageable physics.
But wheels aren’t magic. They need a interface. You can’t just bolt a wheel to a solid axle and expect smooth rotation. That’s toy-car logic. Real trailers deal with complex forces.
There is radial load. This is the weight of your cargo pressing down. Gravity is constant. So is the burden.
Then there is thrust load. This happens when you turn. The trailer tries to slide outward. The wheels try to cut through the air and road. If the connection between the wheel and the hub is loose or dry, those forces create heat. Heat creates wear. Wear creates failure.
This is where roller bearing assemblies save your bacon.
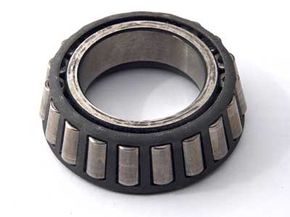
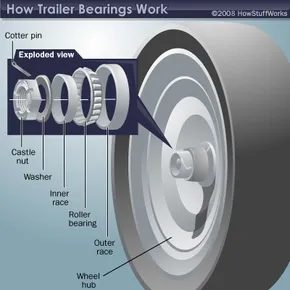
Inside your wheel hub, you have two sets of these assemblies. Each sits between an inner race and an outer race. Imagine a tapered, cylindrical bracelet. Inside that bracelet are metal rollers. They cage themselves in place. When the wheel spins, the rollers ride along the races. They absorb the thrust. They handle the radial weight. They do it over a long, smooth surface area.
That surface area cuts friction to near zero.
Bearing Protectors
If you have a **bearing protector** installed on your trailer wheels, all you’ll need is a grease gun to squirt in more oil. Bearing protectors seal off the bearings and grease from outside elements, but not every model is effective.
The Grease and Water War
Grease isn’t just lubrication. It’s a coolant. Friction generates heat. If that heat stays trapped, it breaks down metal. Grease carries the heat away. It also fills the microscopic gaps between the rollers and races.
But grease has a enemy. Water. And air pressure.
Rubber-lipped seals are your first line of defense. They keep the grease in. They keep the dirt out. Simple, right?
Not always.
Boat trailers are the worst offenders. Here’s why. When you drive your boat into the water, the wheels submerge. The metal hub cools down fast. Cold air contracts. This creates a vacuum inside the hub. Nature abhors a vacuum. It rushes in to fill the void.
It pulls water and dust in through the seals.
If water touches your bearings, rust begins. Rust destroys metal. Rust stops wheels. It’s not a matter of if it happens, but when.
Eventually, you have to open the hub. You have to clean the old grease. You have to check for pitting or corrosion. Then you repack. Or you replace.
Ignoring this maintenance is a gamble. And the house always wins.
Bearing Protectors: A Fix or a Band-Aid?
Some trailers come equipped with bearing protectors. These are devices that mount over the hub. They claim to seal everything off. They promise to keep water out. They promise to keep grease in.
But not all protectors work. Cheap ones crack. Poorly fitted ones leak. They add bulk. They don’t solve the root cause of the vacuum effect if the seal itself is compromised.
If you have one, great. You can top up the grease with a gun. But don’t assume it’s indestructible. Inspect it. Check the seals. Make sure the protector isn’t just adding false security to a failing system.
Your bearings are the difference between a smooth tow and a tow that ends in a tow truck bill. Treat them like the critical mechanical components they are. Check the grease. Check the seals. Respect the load.
Trailer hub bearing replacement steps
You’re likely tearing into a trailer wheel hub for one of two reasons. The bearings are shot. Or you ignored maintenance and now you’re stuck on the shoulder of the highway. The goal is simple. Maintain the grease on your schedule. Not the schedule of a blown bearing at 80 mph.
Grab your tools before you jack it up. You need pliers. A lug wrench. A hammer. A flathead screwdriver. And a safe way to lift the axle. Loosen those lug nuts while the tire is still on the ground. Gravity is your friend here. Once the wheel is off the pavement, the real work begins.
Pop the dust cap. If you have a bearing protector, give it a few light taps with the hammer. Otherwise, pry the cap off with the screwdriver. Straighten the cotter pin holding the castle nut. Pull it out. The castle nut comes off next. Then the washer.
Slide the wheel hub off the spindle. It should come off easily if you haven’t neglected this for a decade. If it’s seized, you’re in trouble. Assume everything is fine and proceed. Pull the outer bearing off the hub. Rock the assembly. Tap it with a mallet if it’s stubborn. If it won’t budge, stop. Go to a pro.
Lay the hub down. Outer bearing facing up. Remove the outer bearing and spindle washer. Set them aside. Pry off the inner seal. Pull out the inner bearing.
Cleaning and packing trailer bearings
Now the dirty work. Extract the inner and outer bearing cages from their races. Wipe out the old grease. Use rags. Then wash the parts in solvent or degreaser. Let them dry completely. Inspect them. Look for rust. Corrosion. Pitting. If you see damage, toss them.
Reassembly requires fresh bearing grease. Boat trailers need the entire hub packed. Water intrusion is the enemy. Standard dry land trailers? Grease the race surfaces. Pack the bearings as full as they’ll take it. You can do this by hand. Or use a bearing packer. They cost $20 or less. Worth it for the consistency.
Insert the inner bearing. Then the seal. Grease the spindle while you’re at it. Place the outer bearing. Then the outer seal. Install the washer. The castle nut. The dust cap or protector.
Put the wheel back on. Lower the jack. Tighten the lug nuts.
Proper maintenance keeps the trailer rolling smoothly. It’s not glamorous. But it’s critical. If you do need to buy replacements, expect to pay around $25 for a set of two bearings and seals. Sizes vary. Always bring the old parts to the store. Matching is non-negotiable.
The links below dig deeper into towing mechanics.
- How Loading and Unloading Towed Vehicles Works
- 10 Tips for Easy Towing
- Is there a green way to tow?
- How Trailer Towing Safety Works
- How Backing Up Towed Vehicles Works
- How Boat Towing Safety Works
- How Launching a Boat Works
- How to Brake While Towing
- How to Shift While Towing
- How to Turn While Towing
-
How to Pass While Towing
-
National Association of Trailer Manufacturers
Sources:
– Doll, Les. “Bearing Service.” The RVers’ Corner. 2005.
– Hetrick, Paul. “How To Repair Wheel Bearings On Your Trailer.” SearchWarp.com. 2007.
– “How The Durahub System Works.” Durahub.com. 2007.
– “Replacing the Bearing, Races and Seals on a Trailer Hub.” Etrailer.com.